Building Low-Latency Voice AI with WebRTC: A Guide to OpenAI's Relay-Transceiver Architecture
Introduction
OpenAI has revolutionized voice AI by scaling WebRTC for real-time, low-latency communication across the globe. Instead of relying on traditional media termination models, they developed a relay-transceiver architecture that works seamlessly with Kubernetes and cloud load balancers. This guide walks you through the key steps to adapt your own WebRTC-based voice AI system—keeping session management separate, reducing public UDP exposure, and placing media routing close to users. Whether you're building a chatbot, virtual assistant, or real-time transcription service, these steps will help you achieve the low latency OpenAI demonstrated.
What You Need
- Kubernetes cluster (cloud or on-premises) with horizontal pod autoscaling enabled
- Cloud load balancer supporting UDP traffic (e.g., AWS NLB, GCP TCP/UDP Load Balancer)
- WebRTC stack (e.g., Pion, Janus, or LibWebRTC)
- Relay nodes (TURN/STUN servers or custom lightweight relays)
- Transceiver service – a dedicated component to manage WebRTC session state
- Media routing logic (for proximity-based routing)
- Monitoring tools (Prometheus, Grafana) to track latency and connection health
- Voice AI model (e.g., Whisper for ASR, GPT for text-to-speech) integrated via API or gRPC
Step-by-Step Guide
Step 1: Understand the Conventional WebRTC Model and Its Limitations
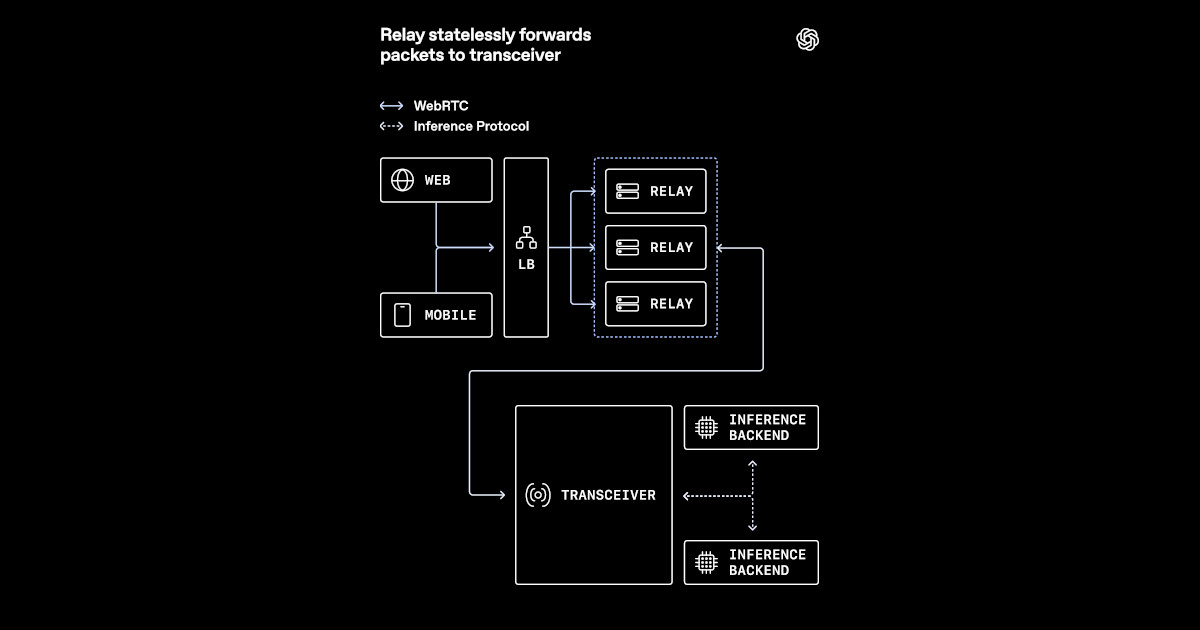
Traditional WebRTC deployments terminate media streams directly on application servers. Each server holds session state (ICE, DTLS, SRTP) and handles media forwarding. This works for small scales but breaks down in cloud-native environments: servers become stateful, load balancers can’t distribute UDP evenly, and public IP addresses are exposed to many clients. OpenAI recognized that to scale voice AI globally, they needed to separate state from media forwarding.
Step 2: Design a Relay-Transceiver Architecture
Replace the monolithic media termination with two layers:
- Relays – lightweight proxies that forward media packets between clients and transceivers. They run in close geographic proximity to users, reducing round-trip time. Relays do not hold any session state, making them stateless and easily scalable.
- Transceivers – stateful components that manage WebRTC connections (ICE candidates, DTLS handshakes, SRTP keys). They are deployed behind Kubernetes services and can scale independently. Each transceiver handles the cryptographic and signaling overhead, while relays handle raw packet forwarding.
Step 3: Implement Relays as Stateless Forwarding Nodes
Write a simple relay that accepts UDP packets from clients, looks up a routing table to determine the destination transceiver (based on connection ID), and forwards the packet. Relays should maintain no persistent state—just a lightweight mapping between client IP/port and transceiver address. This mapping can be stored in a distributed cache (e.g., Redis) or in-memory with periodic cleanup. Because relays are stateless, they can be scaled horizontally behind a load balancer without session affinity.
Tip: Use Connection ID baked into the media packet (e.g., as an RTP header extension) so relays know where to forward without inspecting deep packet contents.
Step 4: Build Transceivers as Stateful Session Managers
Transceivers handle all the heavy lifting:
- Accept incoming WebRTC connections (ICE/DTLS).
- Generate and verify SDP offers/answers.
- Maintain SRTP/SCTP encryption contexts.
- Expose an internal API for the voice AI model to send/receive audio streams.
Step 5: Reduce Public UDP Exposure Using Relays
In typical WebRTC, every client connects directly to a public IP on the server. This exposes many UDP ports and makes DDOS mitigation harder. With relays, only the relay nodes have public IPs. They sit behind a cloud load balancer that terminates UDP and forwards to relays. Transceivers are on private subnets, accessible only by relays and internal services. This drastically reduces the attack surface and simplifies firewall rules. Configure your load balancer to send all UDP traffic to relay pods, not transceivers.
Step 6: Keep Media Routing Close to Users
Use anycast DNS or geo-routing to direct clients to the nearest relay. For example, deploy relays in multiple cloud regions (US-West, EU-West, Asia-Pacific). Each relay announces a route to all transceivers (which may be in a single region). When a client connects, the relay forwards media to the appropriate transceiver. To keep latency low, ensure that relays are within 10-20 ms of end users. OpenAI used a combination of CDN-like edge points and cloud regions to achieve global coverage.
/presentations/game-vr-flat-screens/en/smallimage/thumbnail-1775637585504.jpg)
Step 7: Integrate Voice AI Model with Transceivers
Transceivers receive decrypted audio from relays and pass it to a voice AI pipeline. For low latency, run the model on GPU-enabled nodes in the same cluster or co-located. Use gRPC streaming to send audio chunks as they arrive. The AI model processes the audio (e.g., speech-to-text, sentiment analysis) and returns a response stream that the transceiver sends back through the relay to the client. Ensure that the round-trip time between transceiver and AI model is under 50 ms to meet real-time requirements.
Step 8: Handle Session State in the Transceiver Layer
Do not store session state in relays. All state—ICE roles, DTLS fingerprints, SRTP keys, and media stream metadata—resides in transceivers. When a client reconnects (after a network change), the relay uses the client’s ID to find the same transceiver (or a new one if the session is stateless). To avoid blocking, use an in-memory store with a short TTL (e.g., 30 seconds) plus a fallback to a distributed cache for long-lived sessions. OpenAI’s design ensures that the transceiver layer can be scaled independently: add more transceivers when connection demand grows, add more relays when geographic coverage needs to expand.
Step 9: Test and Tune for Low Latency
Deploy monitoring on relays, transceivers, and the AI model. Measure:
- Round-trip time (RTT) between client and relay
- RTT between relay and transceiver
- Processing time of AI model
- End-to-end latency from voice input to output
Tips
- Start with a single-region pilot: Deploy one relay and one transceiver in the same cloud region to validate the model before scaling globally.
- Use WebRTC data channels for signaling: Keep signaling out-of-band to avoid congestion – OpenAI likely uses a WebSocket-based signal server that doesn’t go through relays.
- Monitor relay health aggressively: Since relays are the front line, any relay failure should trigger automatic replacement. Use Kubernetes liveness probes that send a dummy packet through the relay-transceiver chain.
- Consider encryption at rest: Even though media packets are encrypted with DTLS-SRTP, you may want to store session logs securely.
- Plan for NAT traversal: Relays should support TURN functionality for clients behind symmetric NATs. OpenAI’s relays likely act as TURN servers themselves.
- Test with real voice: Synthetic audio tests miss the dynamic nature of human speech pauses. Run A/B tests with live users to tune jitter buffers.
By following these steps, you can replicate OpenAI’s approach to low-latency voice AI at scale. The key insight is to separate media forwarding (relays) from session management (transceivers), allowing each component to scale independently while keeping latency minimal. This architecture is now a blueprint for any developer building real-time voice applications in the cloud.
Related Articles
- How to Automate Azure Storage Tiering with Smart Tier: A Step-by-Step Guide
- Exploring Recent CSS Innovations: From Clip-Path Puzzles to View Transitions and Beyond
- Cybersecurity Roundup: SMS Spoofing Crackdowns, OpenEMR Vulnerabilities, Roblox Account Breaches, and More
- Securing Autonomous AI Agents on Kubernetes: A Practical Guide
- Microsoft's 345 Commits Propel PostgreSQL as AI Workloads Reshape Database Landscape
- 6 Key Features of the AWS MCP Server Now Generally Available
- Kubernetes v1.36 Finalizes Fine-Grained Kubelet Authorization, Closing Critical Security Hole
- Grafana Cloud Unleashes Custom Cloud Dashboards: Users Now Control AWS, Azure, and GCP Views